Build Your Academic Website with Hugo Blox on GitHub Pages
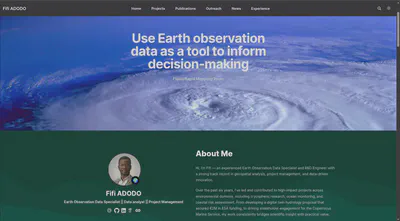
🚀 Create a professional, customizable academic website using Hugo Blox and deploy it for free using GitHub Pages — all automated via GitHub Actions.
“This tutorial provides comprehensive, step-by-step instructions for creating an academic website in 1 day with Hugo Blox and deploying it with GitHub Pages. It guides users through setting up a repository, local development and customising the content, including the CV section and site identity. It emphasises the automation of deployment using GitHub Actions, explaining how changes are built and published automatically. Key concepts such as Front Matter (metadata in Markdown files) and organising content within various folders (e.g. publications and talks) are explained alongside tips for troubleshooting common build or display issues. The tutorial uses a combination of step-by-step instructions, code examples and visual diagrams to facilitate understanding.”
This guide is tailored for:
Windows/Linux users
Intermediate Git knowledge
Automated deployment with GitHub Actions
Prerequisites
Ensure you have the following installed and set up before starting:
Install Required Tools
- Git: Download Git and install it
- Hugo (Extended v0.124+)
- Linux:
sudo apt update && sudo apt install hugo - Windows (Using Chocolatey):Verify installation with
choco install hugo-extended -yhugo version. Ensure it says “extended”.
- Linux:
GitHub Account
- Create one at github.com if you don’t have one yet.
Step 1: Create Your Site Repository
Fork the Hugo Blox Academic Template
- Go to Hugo Blox Academic Template → click "Use this template" (top-right).

- Name your repo as
username.github.io(replaceusernamewith your actual GitHub username).
- Go to Hugo Blox Academic Template → click "Use this template" (top-right).
Clone the repository Locally:
git clone https://github.com/username/username.github.io
cd username.github.io
Step 2: Run the Website Locally
Start a Live Preview Server
hugo server --buildDrafts- Open
http://localhost:1313in your browser to view your site.
- Open
Understand the Hugo Blox Folder Structure
# Folder Structure After Cloning
your-website/
├── config/          # Site configuration file
├── content/         # website cotent
│   ├── home/        # Home page widgets (e.g., CV, publications)
│   ├── publications/ # Research papers
│   └── authors/     # Authors profile
├── themes/          # Hugo Blox theme
└── .github/workflows # GitHub Actions deployment scripts
Content Organization
- Homepage widgets:
content/home/E.g.,
cv.md,publications.md,about.md - Academic content :
- Publications →
content/publications/ - Talks →
content/talks/ - Projects →
content/projects/
- Publications →
- Homepage widgets:
Author profile →
content/authors/admin/_index.mdFront Matter Example: Located at the top of
.mdfiles (YAML format)title: "Curriculum Vitae" widget: pages active: true date: 2025-07-21
Step 3: Customize Your Academic CV
Edit CV section
- Open
content/home/cv.md:- Set
active: trueto enable the CV section. - Adjust
widget: pages→widget: cvfor CV-specific layout.
- Set
- Open
Add Your Academic Profile
- Create or edit
content/authors/admin/_index.md:education: courses: - course: Physical Oceanography and Application institution: | 🏛️ UPS (2013-2018) # ... other entries ... year: 2013 experience: - position: | 👨🏫 PhD institution: | 🏫 Université Paul Sabatier years: 2021-present
- Create or edit
Set Site Identity
- In
config/_default/params.yaml:title: \"Dr. Jane Doe\" description: \"Water Flood Engineer\"
- In
Step 4: Deploy Automatically with GitHub Actions
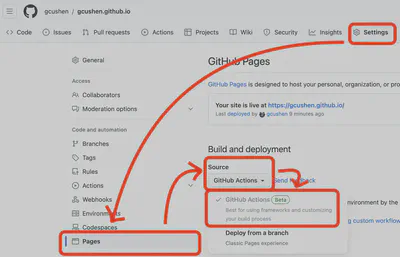
- Enable GitHub Pages:
In your GitHub repo:- Go to Settings → Pages → Build and deployment
- Set Source to GitHub Actions
Commit Changes & Push
git add .
git commit -m "Initial setup"
git push origin main
Verify Deployment GitHub Actions will:
- run
.github/workflows/hugo.yamlscript
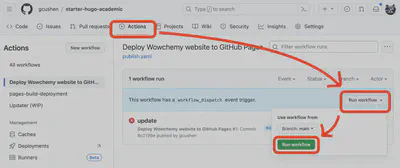
- Deploy your site to
https://username.github.iowithin ~2 minutes.
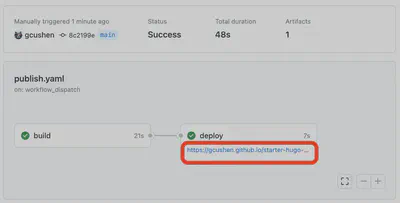
- run
For more detail see at hugo_blox_docs
Key Hugo Blox Concepts Explained
- Widgets
Pre-built components (e.g.,
cv,publications). Enable/disable incontent/home/*.md. Enable them using:
active: true
Front Matter Examples (Publication)
# content/publications/my-paper.md
title: "Deep Learning Breakthrough"
publication: "Nature Journal"
doi: "10.123/abc"
Useful Content Folders:
Folder Purpose content/publications/Individual research papers content/projects/Research projects content/talks/Conference presentations
Troubleshooting Tips
Build Fails on GitHub?
- Check logs under Actions → Hugo
- Common fixes:
- Make sure GitHub Actions is enabled
- Verify Hugo Extended is installed
Local Preview Issues?
- If themes are missing, run:
hugo mod clean - Ensure your are using the Extended version:
hugo version
- If themes are missing, run:
Next Steps
Add papers to
content/publications/Customize your theme and colors
config/_default/params.yamlAdd a contact form via
content/home/contact.mdAdd projects and talks to respective folders
Share your live website!
Need Help?
Feel free to reach out or ask questions if any step is unclear!